Can Nc Code Be Read by a 3d Printer
M-code Basics for 3D Printing
If yous are in a strange land, it's immensely helpful to sympathize some of the spoken language. And just like on your summer vacation, if y'all're regularly working with 3D printers or other CNC machines, understanding how 1000-lawmaking is built up and what some of the instructions mean can enable yous to not only set up problems but also easily customize prints to your needs.
G-code is how nosotros tell our machines what they need to practice. It has been around since the late 1950s and is the almost widely used Computer Numerical Control programming language. Though, don't be scared if I say programming linguistic communication because it's i of the almost unproblematic languages you tin think of because in the form it's used on most 3D printers, there are no loops, no if statements, no brackets, or any other fancy stuff. If you fix a model in your favorite slicer and open up the generated Chiliad-code in a text editor, you can see that it's only a list of commands that our 3D printers' firmware reads and so executes – one line after the other. We'll look at the most common G-code flavor for 3D printers, which is compatible with the marlin firmware. If you're running a printer with RepRap firmware or mayhap a CNC router with Mach 3 the overall look of the file will exist the same though some commands might practice slightly different things. In this video I'll comprehend the most common commands that will enable you to empathise 95% of your 3D printing G-Code just if you lot want to learn more than, there are references of all commands and how Thousand-code needs to await for a specific firmware. I've linked a couple of these resources downwards in the clarification.
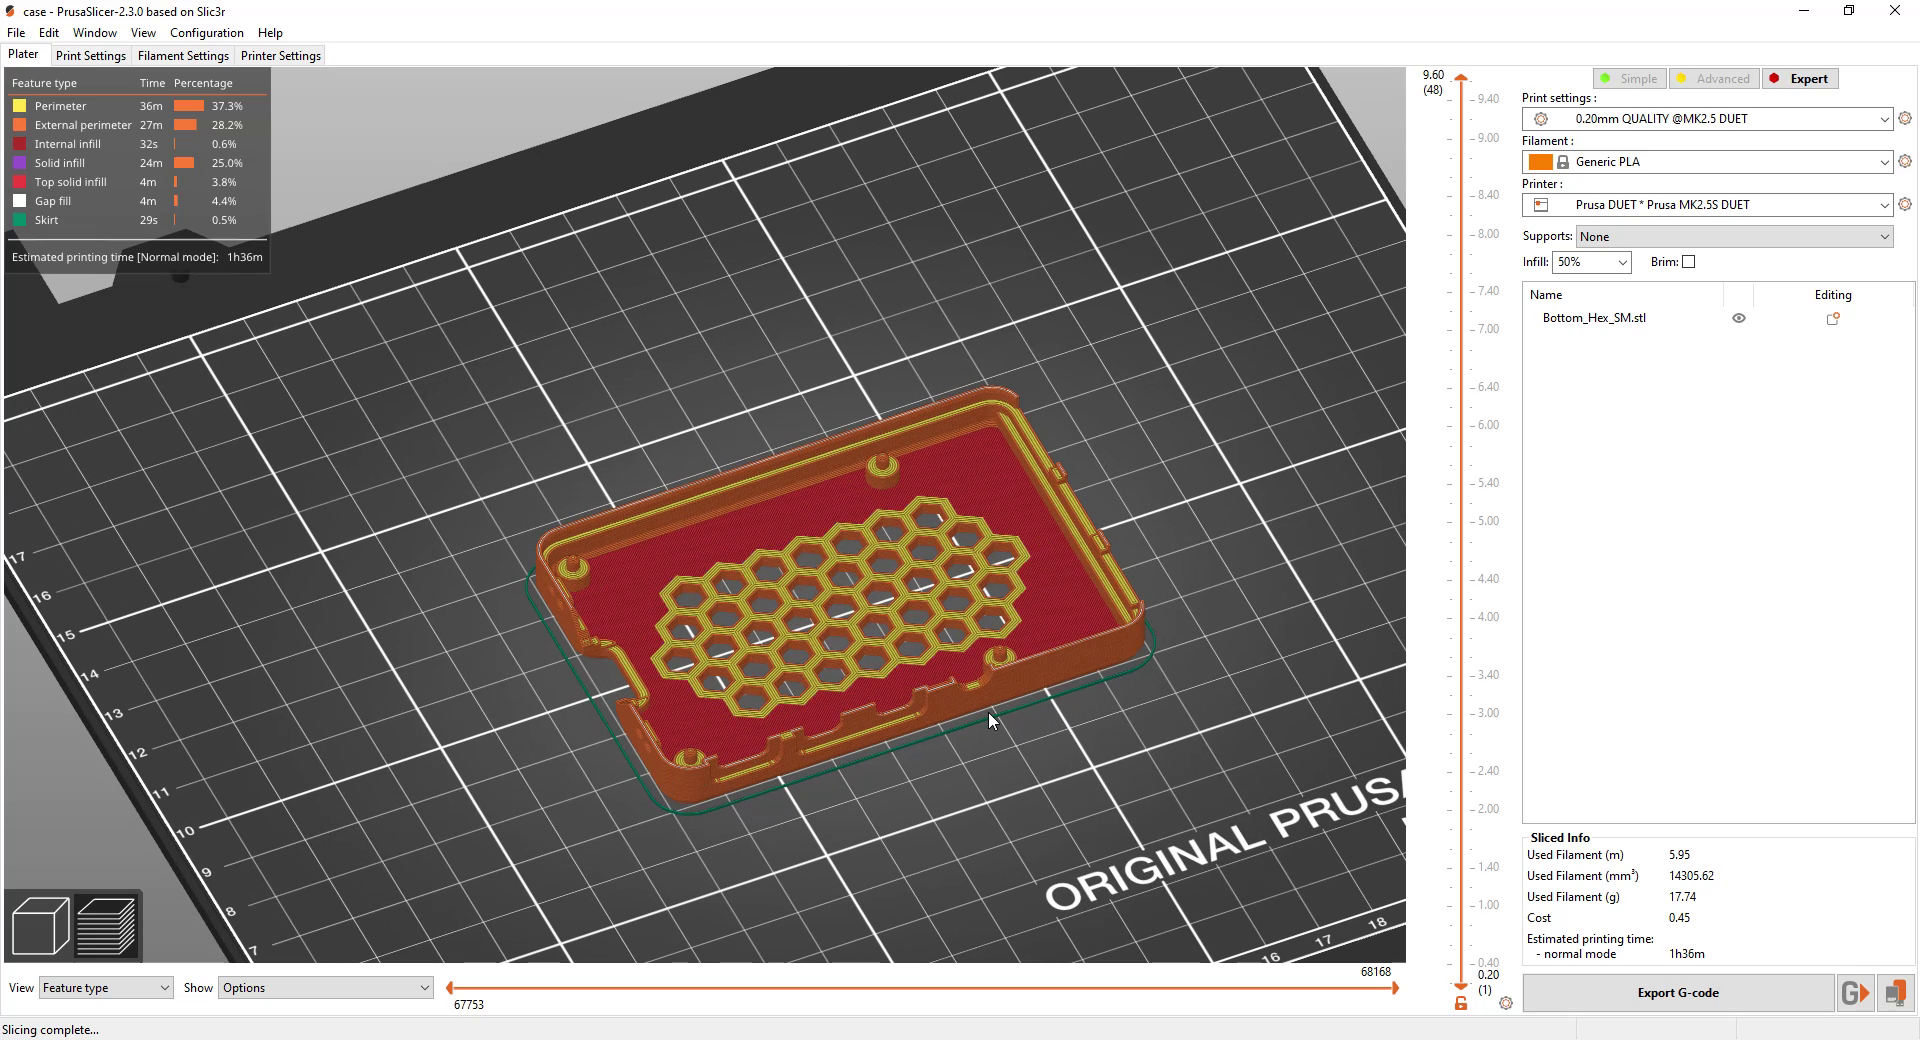
One thousand-code visualization in PrusaSlicer
So let's look at Marlin-Grand-code. As I said earlier, each line of code is processed i afterward the other – from the outset of the file till its end. The files are usually build upward with a header that includes some general information. Side by side follows the start g-code that you can customize in your slicer, then the print commands with the end Grand-code. There is also oft a block of text that contains all of the slicer settings that were used. This settings section is sometimes very helpful if you lot forgot to save a profile or received a g-lawmaking file from somebody else that printed actually well. Some slicers volition allow y'all to import the One thousand-code file and generate a profile out of the settings, though commonly only if the G-code was also created with the same slicer.
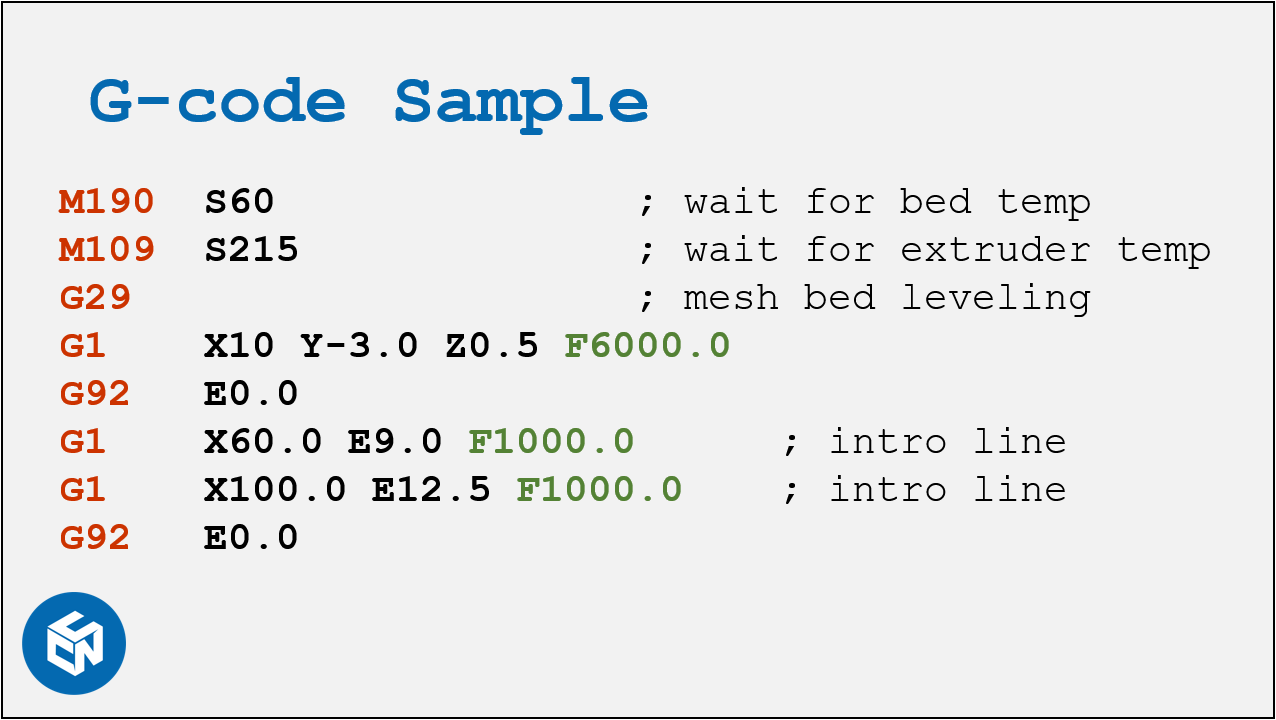
A sample Marlin One thousand-code
Comments
If we look at the header or the settings block, we tin can already see something important. Those lines normally beginning with a semicolon. Having a semicolon at the offset of a line means that this is a comment, and then it will be ignored by the firmware. You can't simply comment out a whole line but also add a annotate after a regular command to make the code better readable. Slicers volition likewise often add comments and so that information technology's easier for you lot to find a certain layer or a certain characteristic. Merely for completeness – some firmwares back up comments in brackets every bit per CNC M-code standard, though this style gets rarely used.
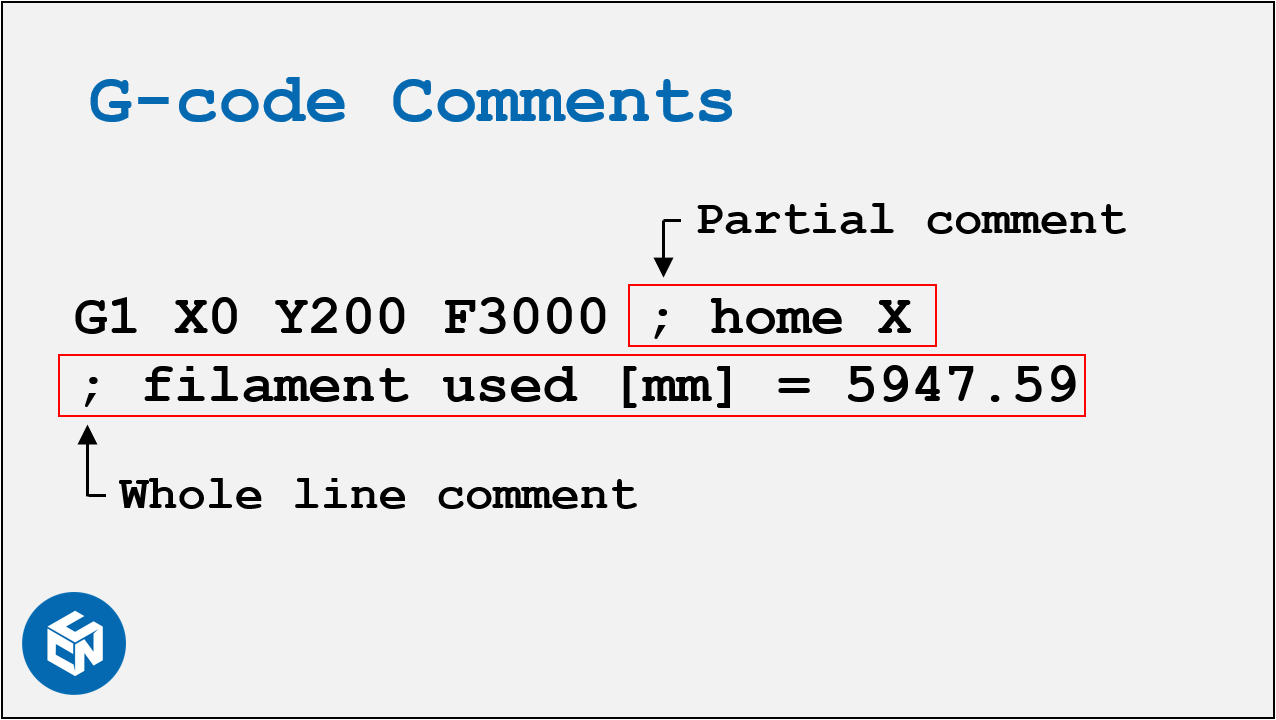
Comments in G-lawmaking
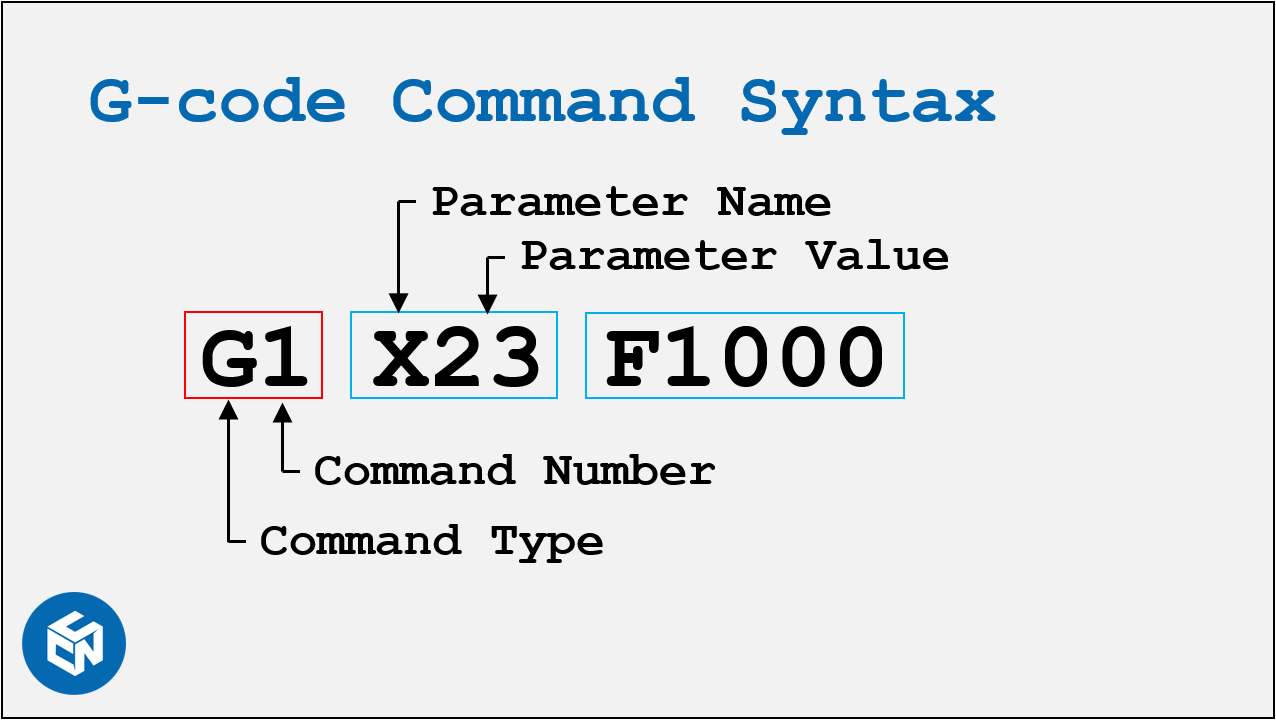
Syntax
Let'southward now take a look at the syntax of G-code commands. Each command starts with a letter. Thou stands for preparatory commands and is usually used for movement related tasks. M commands or Miscellaneous commands are often used to change settings or perform actions. The post-obit number references a specific command. Next follow the parameters for that G-code command with a descriptive letter followed by the value. Actually uncomplicated.
G0 & G1 - Linear Move
Let'southward start with the near common commands which are G0 and G1 and are used for the move of the axes. The XYZ parameters define the location where it needs to move, E defines the corporeality of fabric extruded, and F defines the federate, unremarkably in mm per minute. G0 and G1 don't crave values for all axes and too the federate simply needs to be ready once and volition persist until it gets changed. G0 was used in the past for rapid moves where precision wasn't needed, G1 on the other hand, was a coordinated linear move from one to another position. On today's 3D printers G0 and G1 practice practically the same and there is only the convention that G0 shall be used for travel movements and G1 for movements where also fabric gets extruded.
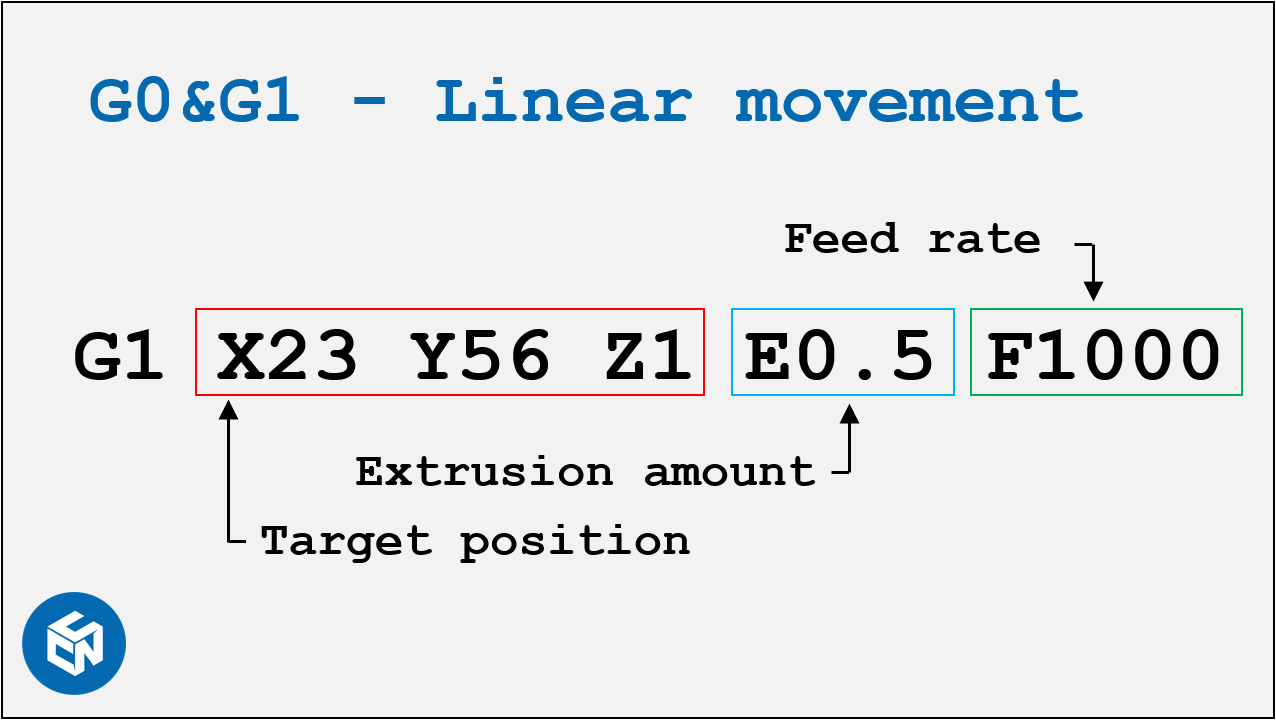
G0 & G1 - Linear movement
G90 & G91 - Positioning Way
A very important command pair in context to G0 and G1 is G90 and G91. These set the positioning mode to absolute or relative. If G90 is set, all movements are to absolute positions in the printers coordinate arrangement. So G0 X50 Y50 will motility the tool head to X50, Y50 a following G0 X100 Y100 will motion the caput to X100 Y100.
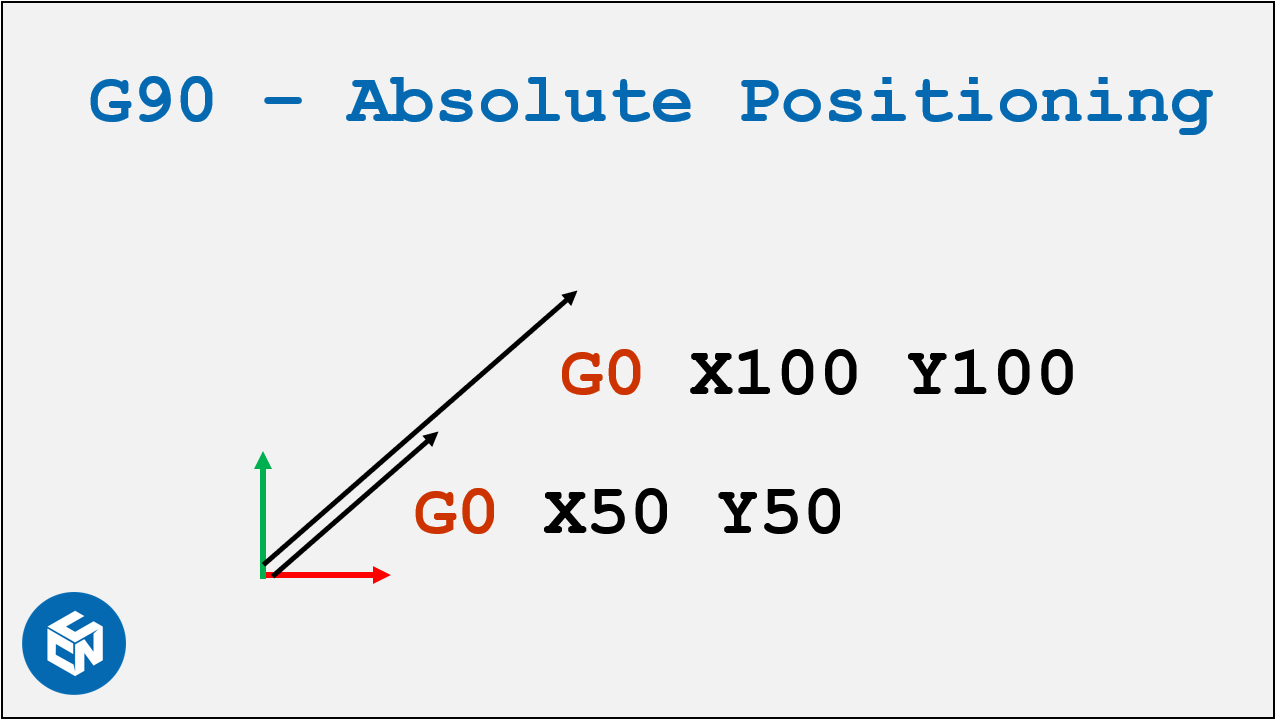
Absolute Positioning
If G91 is prepare, all movements are relative to the last position. So if we first at the origin X0 Y0 and transport G0 X50 Y50, we will move to X50 Y50 though if we then transport G0 X100 Y100, we'll perform an incremental motility and end up at X150 Y150.
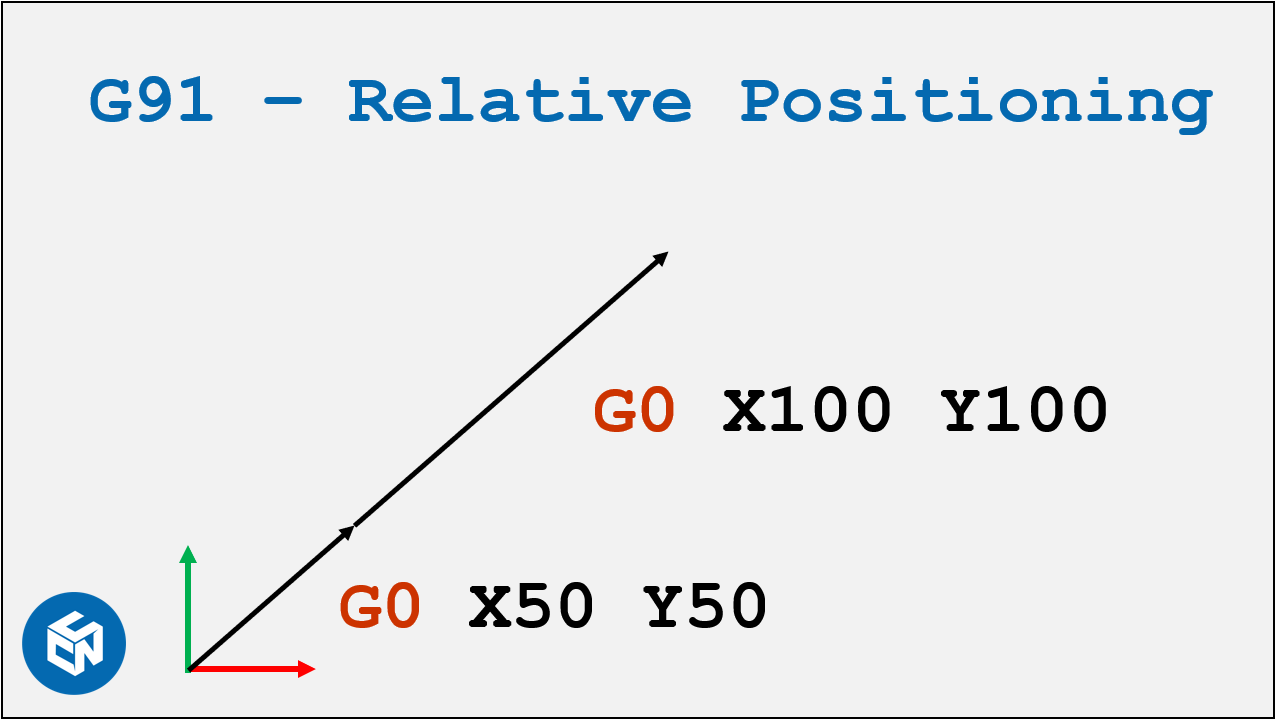
Relative/Incremental Positioning
Almost of the movements in your GCode file volition exist achieved using accented positioning. Where relative positioning might be useful is, for example, for your stop G-Code, where you want to elevator your nozzle from the impress and move abroad. So regardless of your model elevation, G91, then G0 Z10 will always lift the printhead by 10 mm. Correct later on that, we switch dorsum to absolute positioning with G90 and tin move the nozzle to the edge of the printbed.
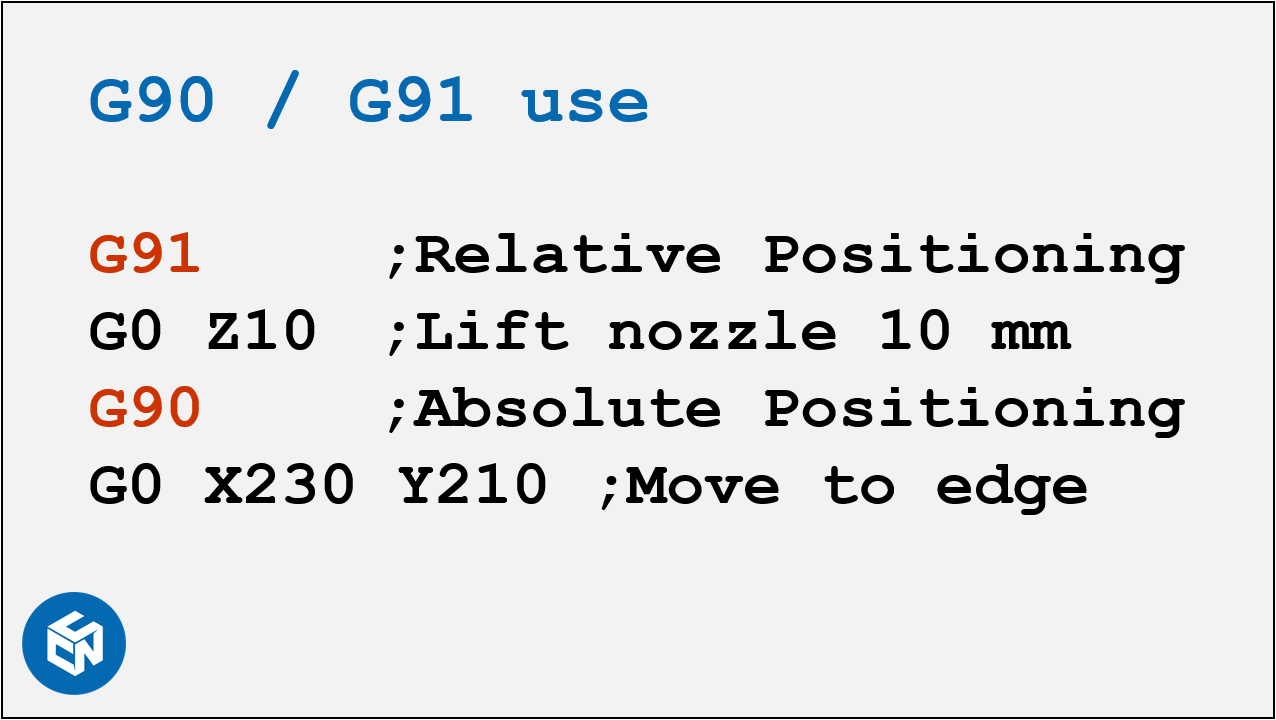
Stop script example to lift the nozzle and move it abroad
M82 & M83 - Extruder Positioning Style
Also related to the print moves is the control pair M82 and M83. Even though it might seem a bit weird in the first, simply our filament extruder is the quaternary axis of our 3D printer and can be switched separately from absolute to relative positioning, merely similar our motility axes. M82 sets the centrality to absolute mode, M83 to relative. This setting is mostly a preference of the slicer that you're using. CURA by and large puts out extrusions in absolute coordinates, so M82, whereas PrusaSlicer, for example, defaults to relative extrusions with M83. In that location are discussions on whether one or the other is better or worse for accumulated relative error, though in my feel information technology doesn't really matter and is more a question of what style yous prefer.
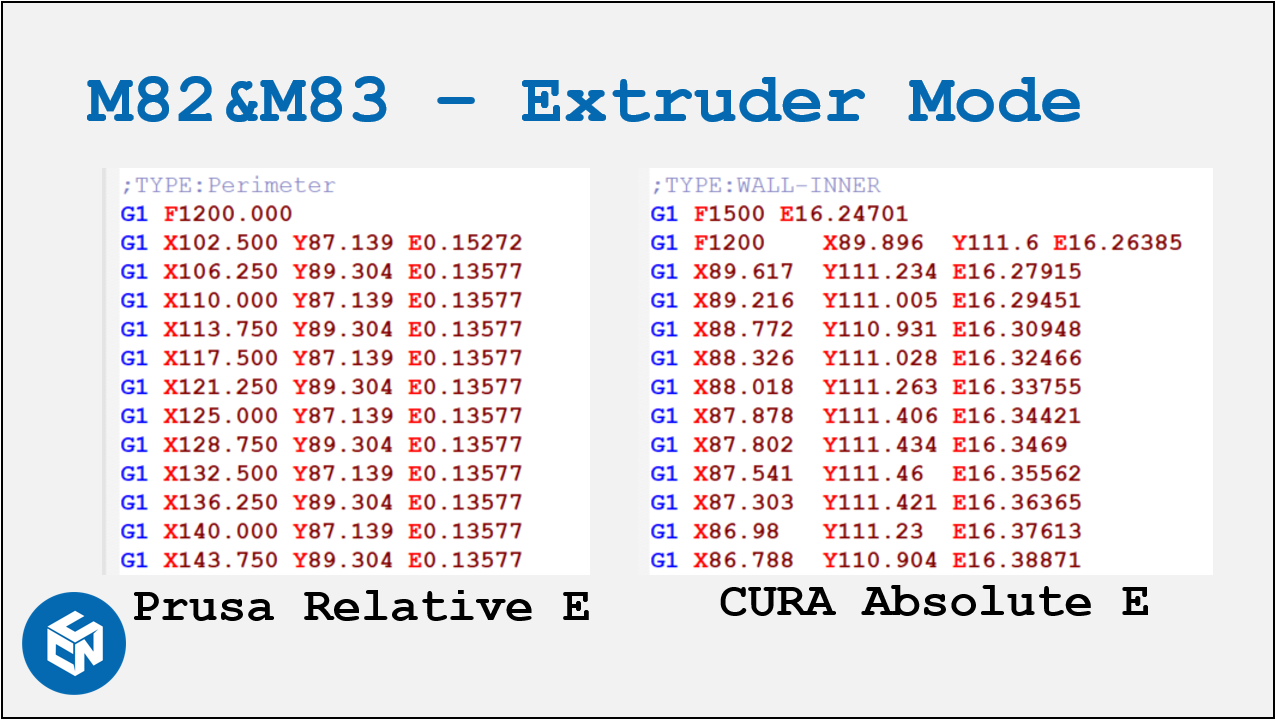
Instance G-Lawmaking from unlike slicers
G28 - Homing
Most of our 3D printers use unproblematic stepper motors for the axes without whatsoever positional feedback. This means that when you turn your automobile on, it doesn't know its at. This is why basically every G-code file that we run on our printers contains G28 right at the start. G28 initiates the homing routine, where the motorcar moves to end stops with known positions. This can be as simple every bit just issuing G28 where all axis become homed 1 afterward the other. By adding the Ten, Y or Z parameter or a combination of them, nosotros can tell the firmware to but home i or two axes.
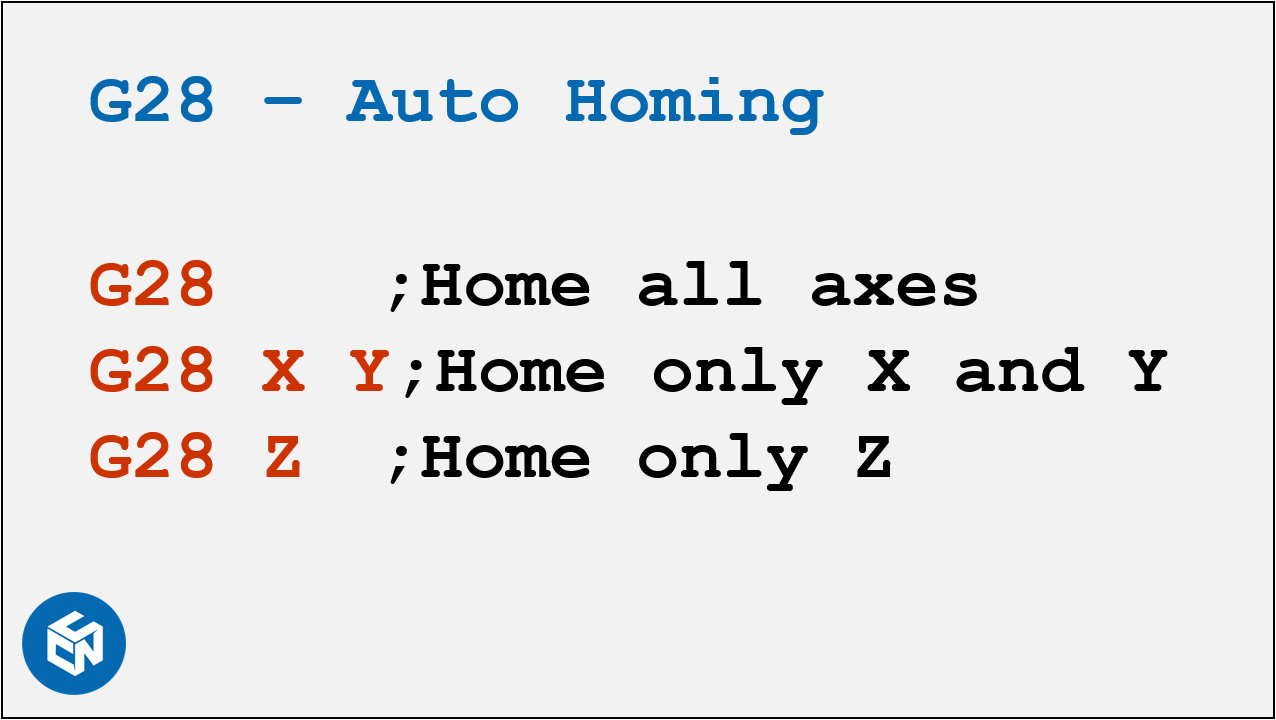
Dissimilar ways to home the axes
G29 - Bed Leveling
More and more 3D printers first shipping with bed leveling probes where G29 is used to outset the leveling process. G28 and G29 usually come in successive society because the axes need to exist homed before yous first bed probing.
G92 - Set Current Position
In a mode similar to homing, using the command G92 lets us set the current position to a specific value. And then regardless of where you are, sending G92 X0 Y0 Z0, for case, will tell the printer that the current location is the new origin of the coordinate system. In 3D printing, G-lawmaking G92 is nigh commonly found when absolute extrusions are used, and the extruder centrality is reset for ameliorate readability.
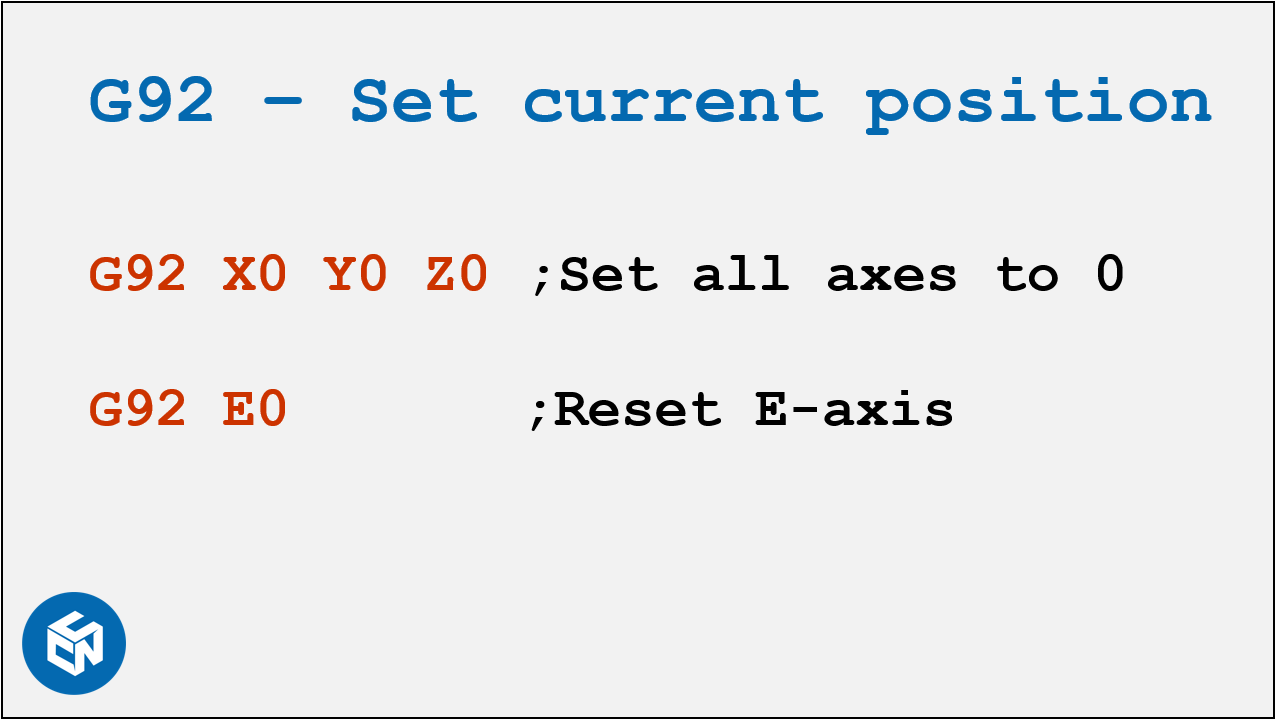
G92 examples
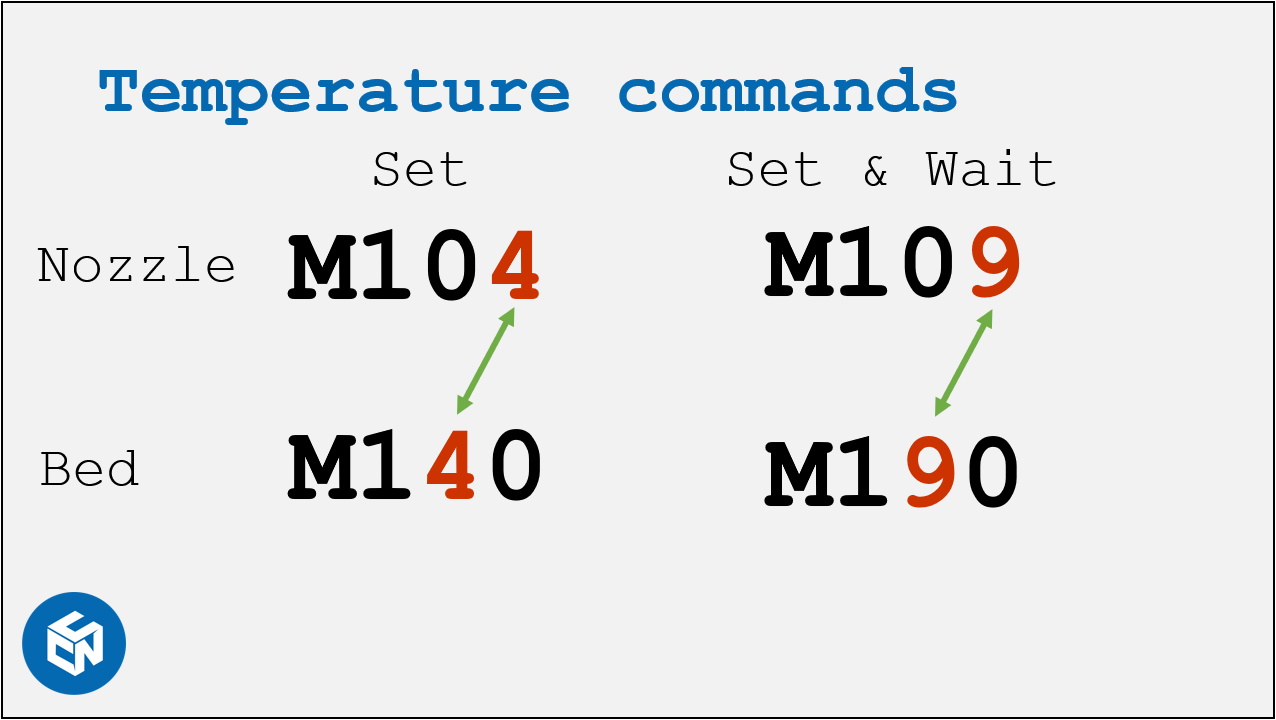
M104 & M109 + M140 & M190 - Temperatures
Let'south now talk about temperatures and, in particular, nozzle and bed temperatures. With M104 and M109 plus the parameter South, the nozzle temperature gets set. But what's the divergence betwixt this pair of commands? M104 merely sets the nozzle temperature, then the execution of the G-code will continue as usual. M109, on the other hand, sets the temperature and then pauses the M-lawmaking execution until the temperature is reached. This is exactly the same when setting the bed temperature. M140 will simply set the intended temperature, M190 volition set it and pause until the temperature is reached.
Past the manner, the two pairs of commands are actually easy to retrieve because the numbers 4 and 9 are just shifted by one digit.
Commands follow a like scheme
You'll basically discover them in any start script where you lot want to wait until the proper temperatures are reached and simply then start the impress. If your printer starts heating the bed and nozzle simultaneously, y'all'll find M104, M140, M109, M190.
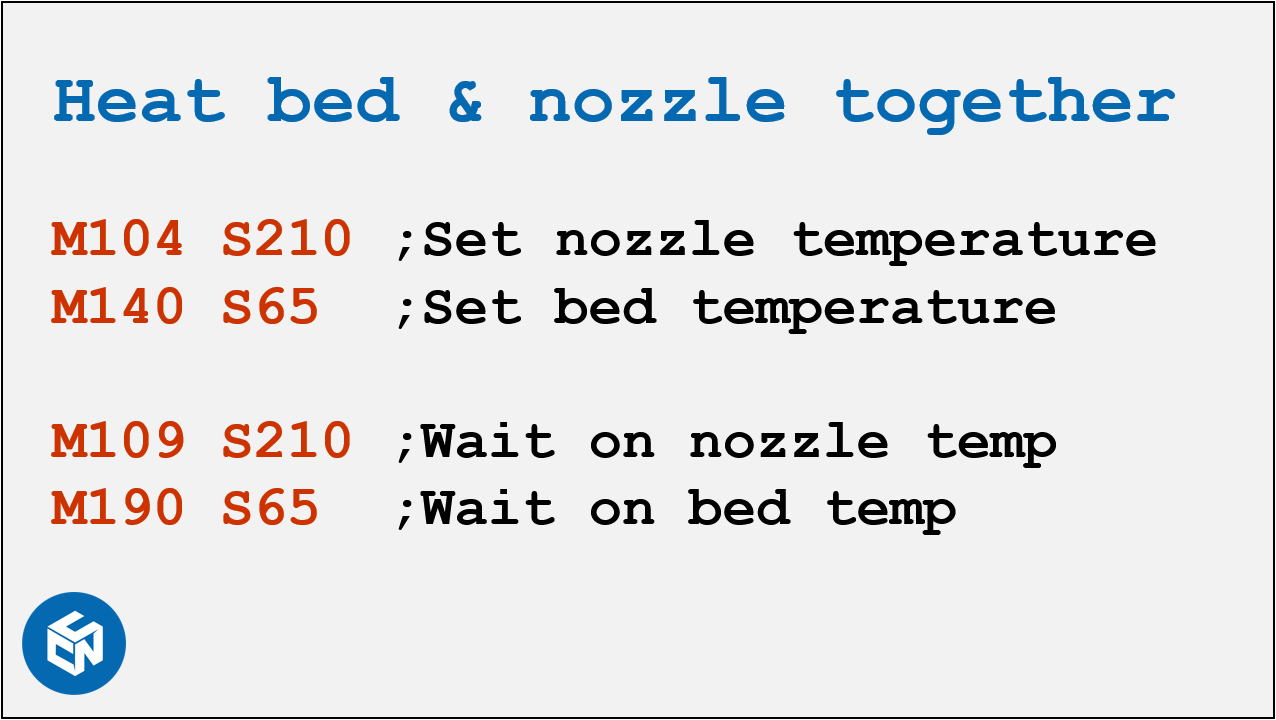
Heat nozzle and bed simultaneously
Some machines get-go oestrus the bed and and then the nozzle to avoid material oozing. In this instance, you'll ordinarily detect M140, M190, M104, and M109 in the starting script.
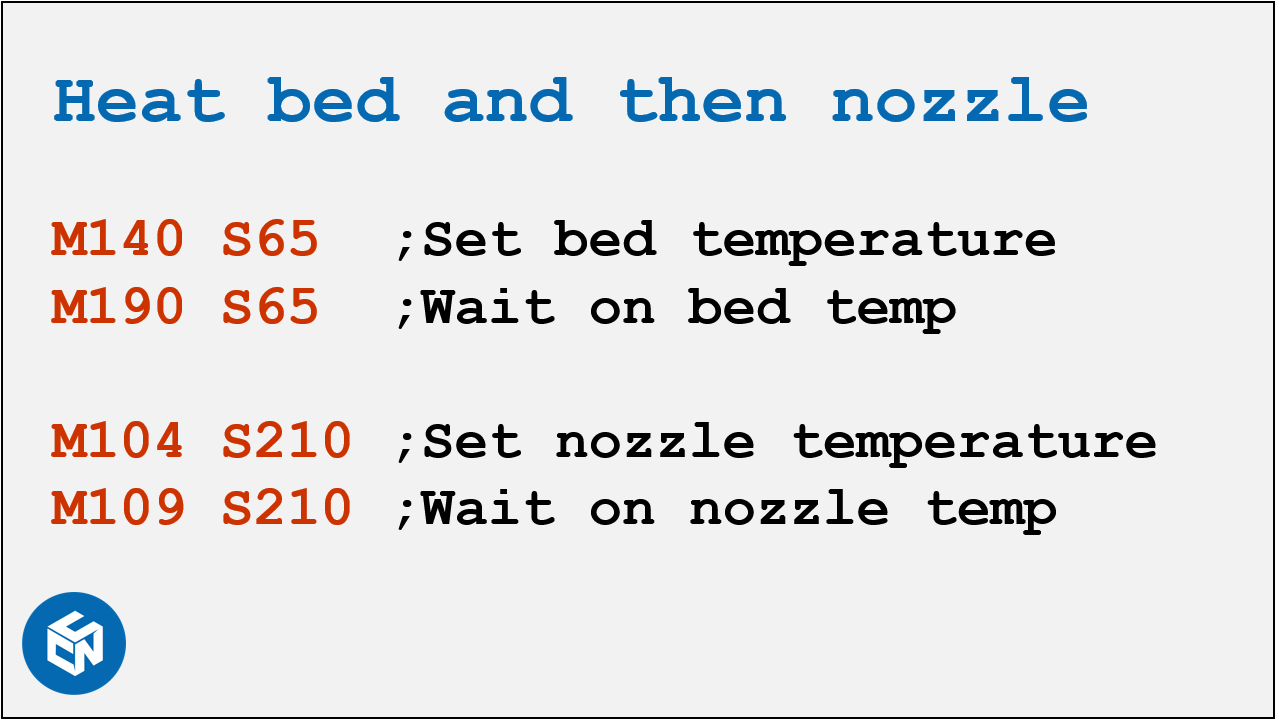
Starting time estrus the bed, and then the nozzle
So if y'all're tired of waiting for bed and nozzle to oestrus up one after the other, you now know what to change in your start script! In my example, I often manually add M104 commands into my G-codes at certain heights to customize my temperature towers. I don't use M109 because the new temperature usually gets reached within one layer, so pausing the impress causes more than problems than it helps.
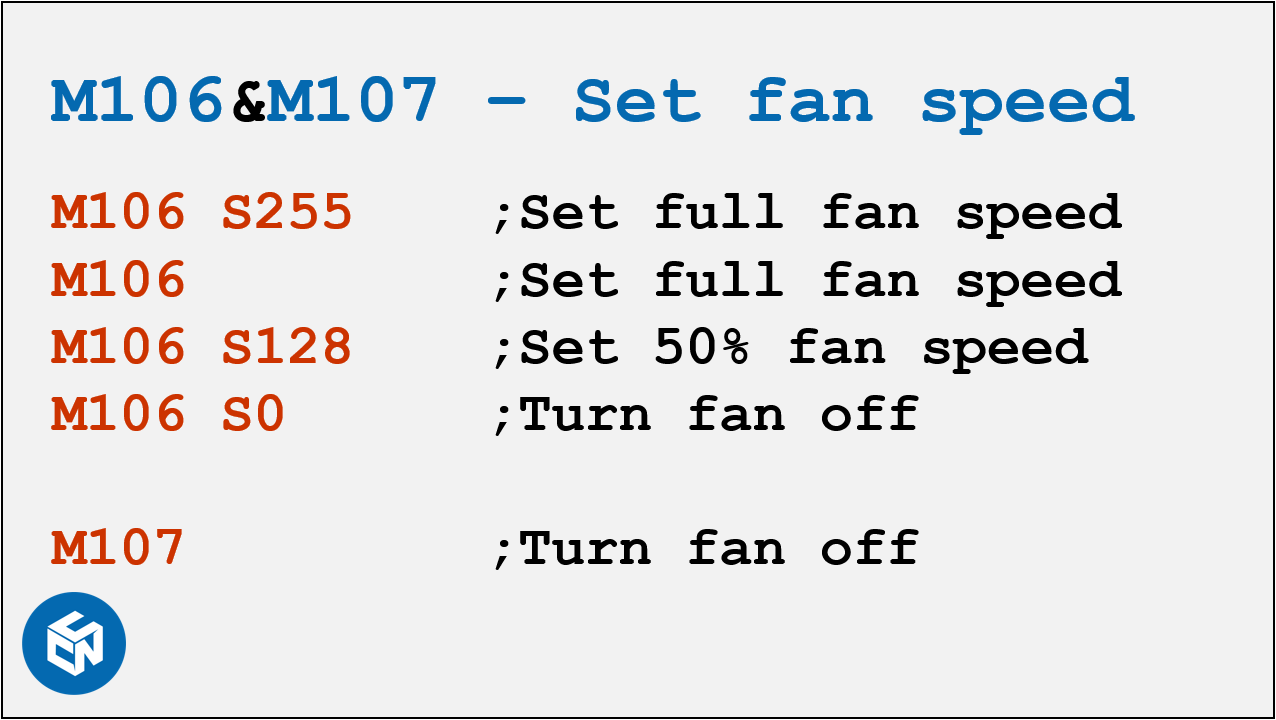
M106 - Set Fan Speed
Another important command is M106 which is used to control the cooling fan. The parameter South, which can range from 0 to 255, lets you adjust its speed. Full power is 255 and half power is 128 for example. If you want to plow it off completely, M106 S0 or the defended command M107 gets used.
Fan settings examples
M84 - Disable Steppers
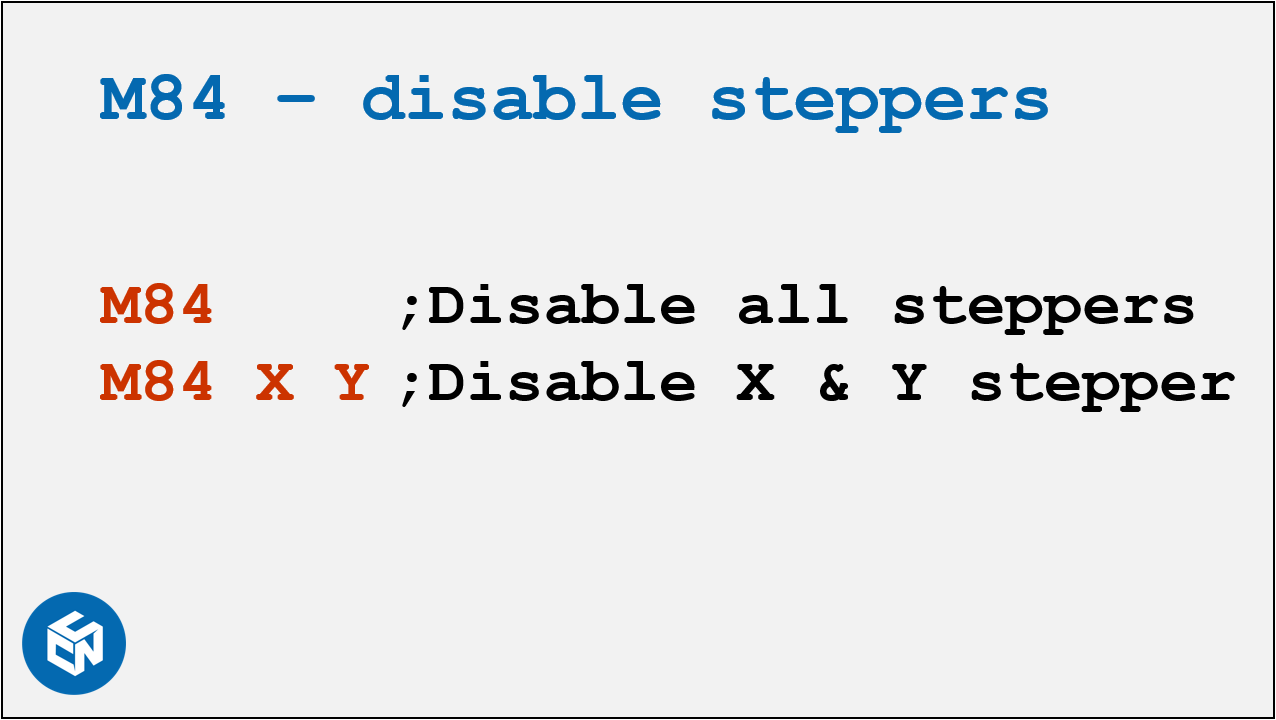
The last command I desire to talk almost is M84. The stepper motors volition remain powered after moving an axis using the printer'south command to avoid losing their position. If you want to disable the motors so that the axes can be moved by manus, you can use M84 for all axes or M84 with the 10, Y, Z, and East parameters to turn off individual axes.
Disable Stepper Motors
And that'due south information technology! If you lot call up these 10 commands or pairs of commands, you will understand most of the G-Code that your slicer generates and customize printing routines to your liking. Of course, there are many more than commands, but the ones I presented to you lot are the most important ones, in my opinion. Let me know in the comments which command you think is the about important to remember and when the cognition almost G-code is most practical?
Source: https://www.cnckitchen.com/blog/g-code-basics-for-3d-printing
0 Response to "Can Nc Code Be Read by a 3d Printer"
Post a Comment