It Appears That the Photo I Attached Was Not Sent
It's piece of cake to attach pictures, files, contacts, emails and many other items to your Outlook messages. Outlook keeps runway of the documents you've recently worked on, whether they're stored on your computer or saved in OneDrive (cloud merely). And no matter where they're stored, Outlook lets you lot quickly choose whether to send the document as a traditional attachment or upload it to OneDrive and share a link to the file. Yous tin also set permissions on whatever file sent from OneDrive that allow bulletin recipients to view and edit them, or share them with others.
To solve problems attaching files, see Solve problems with attachments.
What would you like to exercise?
Outlook keeps track of the files you have worked on recently and suggests them whenever you lot decide yous want to attach a file to an email message. Some file types are blocked from being sent or received. Run into Blocked attachments in Outlook for the complete list.
-
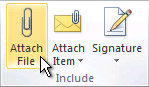
In a new message, a reply, or a forwarded bulletin, select Attach File from the Message ribbon or the Insert ribbon.
-
Select your file from one of the following locations:
-
Recent items
The 12 well-nigh contempo files you've worked on will be displayed here. These files may be on your estimator, on OneDrive, SharePoint, or another online certificate library. Select a file to attach information technology to your email. -
Browse Spider web Locations
Locations include OneDrive,SharePoint sites, or other locations such equally a groups document library that you've accessed before. Select ane of the locations to open a new window and then select your attachment. -
Browse This PC
Opens a File Explorer window where you can choose a file from your computer.
-
-
If you selected a file on your local computer or group document library, a copy of the file is attached to the e-mail. Selecting a OneDrive or SharePoint file, yet, provides you with additional permission options and data.
-
Send a link or send a copy Sending a link to the OneDrive or SharePoint file keeps the size of your email message pocket-size. If you cull to send a re-create of the file, the entire file is attached to the email, only like it would be if you selected a file on your computer. If you choose to send a link to the file, you can also ready the permissions on your file.
-
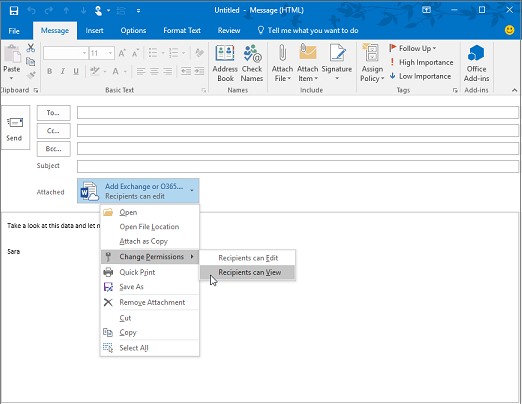
By default, if you're in a business organization environment, everyone within your organization can edit the linked file. To change these permissions, select the arrow at the correct of the attachment name to display a drop-down menu with a variety of permission options.
-
Organization tin Edit if you desire anyone in your organisation to exist able to alter the file.
-
Organization tin can View, if you want anyone in your system to be able to read, but non modify, the file.
-
Recipients can Edit if yous want but the recipients of your e-mail to be able to change the file.
-
Recipients can View if you want simply the recipients of your e-mail to be able to read, but not modify, the file.
-
-
If Outlook detects that your recipients won't be able to view the file, for case if it'due south stored on a SharePoint site that's simply accessible to y'all, you'll see a warning message directly nether the file icon and name. Select Attach as copy to alter the attachment from a linked file to a copy of the file.
Note:If you attach a file as a copy, any changes your recipient makes won't be synchronized with the version of the file in OneDrive or on SharePoint.
When y'all attach a document that is saved on your reckoner and not in an online location, you too tin choose to upload the document to your OneDrive earlier sending the email. Uploading the zipper makes collaboration easy. You can be sure that everyone is collaborating on the same (and most upwards-to-appointment) version of the file. You may also choose to upload to OneDrive if the file is too large to share as a traditional attachment.
-
On the ribbon, click Attach File > Browse This PC, and cull the file you want to attach.
-
In your email message, select the down arrow for the zipper.
-
Choose Upload to OneDrive, and then choose the desired location for the file.

Annotation:You might run into choices such as the OneDrive location for your piece of work account, the OneDrive location for your personal account, and document libraries for diverse groups you belong to.
-
In your email message, select the down arrow for the attachment over again.
-
Choose Change Permissions, and and then choose one of the following:
-
Organization tin can Edit if you want anyone in your arrangement to be able to modify the file.
-
Organization tin View, if you want anyone in your system to exist able to read, simply not alter, the file.
-
Recipients can Edit if you want only the recipients of your e-mail to be able to modify the file.
-
Recipients can View if you want simply the recipients of your e-mail to be able to read, but not modify, the file.
-
When sending pictures, you lot can either attach the movie to the electronic mail message or insert the film in the message body. To insert a picture that displays in the trunk of an electronic mail message, utilize the following steps:
-
Position your cursor where yous want the image in your message.
-
In the ribbon, select Insert > Pictures.
-
Browse your reckoner or online file locations for the moving picture you want to insert. Select the picture, so select Insert.
-
To resize the picture, drag the handles at 1 of the four corners toward the heart of the paradigm or away from the heart.
-
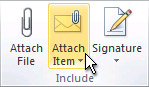
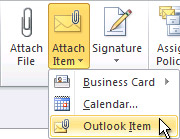
In a new message, select Attach Item.
-
Choose ane of the following:
-
Business Card
Choose an electronic business organization card from your contacts list. -
Calendar
Cull Date Range, Details, and other options as advisable. -
Outlook Item
Choose one or more email messages from whatsoever of your e-mail folders.
-
-
Select the item you want to attach, and then select Insert.
What would you lot similar to practise?
Outlook blocks some file types from being sent or received. See Blocked attachments in Outlook for the consummate list.
-
In a new bulletin, select Attach File from the ribbon.
-
Select the file y'all want to adhere and and then select Insert.
When sending pictures, you lot can either attach the picture to the email message or insert the moving picture in the message trunk. To insert a motion-picture show that displays in the body of an email message, use the post-obit steps:
-
Position your cursor where y'all want the image in your message.
-
Select Insert > Pictures.
-
Scan your calculator or online file locations for the moving picture you want to insert. Select the picture, then select Insert.
-
To resize the picture, drag the handles at one of the four corners toward the center of the paradigm or away from the center.
-
In a new message, select Attach Item.
-
Choose one of the following:
-
Business Card
Choose an electronic business concern bill of fare from your contacts list. -
Calendar
Choose Date Range, Details, and other options every bit appropriate. -
Outlook Detail
Choose one or more e-mail messages from any of your email folders.
-
-
Select the item you want to attach, and then select Insert.
What would you like to practise?
-
Create a message, or for an existing bulletin, click Reply, Reply All, or Forward.
-
In the bulletin window, on the Message tab, in the Include group, click Attach File.
-
Browse to and click the file that you desire to attach, and so click Insert.
Notation:When composing a message, you lot tin also adhere files past using the commands on the Insert tab in the Include grouping, or elevate files from folders on your computer and drop them on the message window.
When sending pictures, you tin either attach the picture to the email bulletin or insert the moving picture in the message body. To insert a picture that displays in the trunk of an email bulletin, use the post-obit steps:
-
Position your cursor where you want the epitome in your message.
-
Select Insert > Pictures.
-
Browse your reckoner or online file locations for the picture you desire to insert. Select the moving-picture show, then select Insert.
-
To resize the picture, elevate the handles at one of the 4 corners toward the middle of the image or away from the centre.
You tin attach Outlook items, such as other email messages, tasks, contacts, or calendar items to a message. This is the easiest style to forward multiple items or messages.
-
Create a message, or for an existing bulletin, click Reply, Reply All, or Forward.
-
In the bulletin window, on the Bulletin tab, in the Include group, click Adhere Particular.
-
Practice one of the following:
-
Point to Concern Carte, and then click Other Business Cards. Click a contact, then click OK. To select multiple contacts, press and hold Ctrl equally y'all click each contact.
-
Click Calendar. Cull the calendar, appointment range, and detail to include. For Advanced options, click Show. Click OK to add the calendar to your bulletin.
-
Click Outlook Item. Browse through your binder list to find the folder that contains the item that you desire to adhere. Nether Items, click the particular, and then click OK.
-
Note:When composing a bulletin, you likewise can attach files by using the commands on the Insert tab in the Include group. Or move files from folders on your computer to the message window by using a drag-and-drop operation.
Important: Function 2007 is no longer supported. Upgrade to Microsoft 365 to work anywhere from any device and continue to receive support.
Upgrade now
What would you lot similar to practice?
-
On the File menu, click New, and then click Postal service Message.
-
On the Message tab, in the Include grouping, click Attach File.

-
In the Insert File dialog box, browse to and choose the file that y'all desire to attach, and then click Insert.
More information
-
If you don't run into the file that you want in the appropriate folder, brand certain that All files (*.*) is selected in the Files of type box, and that Windows Explorer is configured to testify file name extensions.
-
You likewise canattach file from the new message's Insert tab.
-
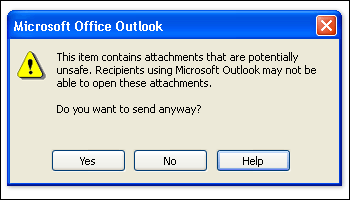
By default, Outlook blocks potentially unsafe attachments (including .bat, .exe, .vbs, and .js files) that might comprise viruses. If you adhere such a file to an east-mail bulletin, you will exist asked whether you desire to ship a potentially dangerous attachment. If yous reply Yes, Outlook will send the attachment. If you respond No, you can and then remove the potentially unsafe attachment.
-
You tin can attach multiple files simultaneously past selecting the files and dragging them from a folder on your figurer to an open bulletin in Outlook.
When sending pictures, you can either attach the film to the email bulletin or insert the motion picture in the message body. To insert a picture that displays in the body of an email message, use the post-obit steps:
-
Position your cursor where you lot want the image in your message.
-
Select Insert > Pictures.
-
Browse your computer or online file locations for the picture you want to insert. Select the picture show, and so select Insert.
-
To resize the pic, drag the handles at one of the four corners toward the centre of the image or away from the eye.
-
On the File bill of fare, click New, so click Mail Message.
-
On the Bulletin tab, in the Include group, click Attach Item.

-
In the Look in list, click the folder that contains the item that you desire to attach.
-
Click the particular that you want, and so click OK.
Note:You also can adhere an item from the new message's Insert tab.
Where attachments appear in your message depends on the format in which yous compose the message.
-
If the message format is HTML or manifestly text, attachments appear in the attachment box beneath the Subject line.

-
If the message format is Rich Text, attachments appear in the body of the message. Even though the file appears to be embedded in the message, it is actually still a separate zipper.
The format in which a message is composed is indicated in the title bar at the top of the message.

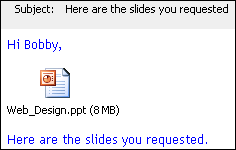
Outlook does not impose any size limit on attachments. Nonetheless, nigh electronic mail server administrators and Internet service providers (ISPs) practise prepare limits on the overall message size, which is the sum of all attachments plus the content of the message itself. Typically, premium-level services provide more than e-mail file storage space and allow larger messages than standard-level services. For more information on the maximum allowed bulletin size, contact your Internet access provider or the e-mail server administrator in your organization.
If you're attaching a very big file, you lot should first shrink the file past using a zero program. Outlook files that are saved in the default Open up XML Formats with the post-obit file extensions are automatically zipped: .docx, .dotx, .xlsx, .xltx, .pptx, .potx, and .ppsx.
If files that you adhere are zipped when you lot do not expect them to be, check to see whether a .nothing utility has been installed in Outlook as a COM add together-in. You can disable this sort of add-in by doing the post-obit:
-
On the Tools carte du jour, click Trust Center, and so click Add-ins.
-
In the Manage list, click COM Add-Ins, and then click Go.
-
In the COM Add-ins dialog box, clear the check box next to the add-in name, and so click OK.
-
Why tin can't I attach a file? Outlook tells me the file is dangerous. Outlook blocks numerous file types that have the potential to spread computer viruses. To ship a file that Outlook identifies as unsafe, zip the file first, and so attach the zipped file. To zip a file, navigate to the binder on your figurer or in the cloud that contains the file, right-click the file, and select Transport to compressed (zipped) folder. You should and then be able to transport the zipped file. For more information, meet Blocked attachments in Outlook.
-
Why do my attachments prove upwardly in the bulletin body and not below the subject line? Outlook allows yous to send email messages in 3 formats: HTML, plain text, and rich text. If you utilize rich text format (RTF), whatever files you attach will show up in the message torso. See Change your message format for instructions on how to switch your message format to HTML or plain text. Yous tin can check your bulletin format by looking at the title bar of the message.

-
The Insert > Pictures choice is grayed out. If you can't select Pictures from the Insert tab on the ribbon, your bulletin is probably in plain text format. Change your message format to HTML or rich text to insert pictures. You can cheque your message format past looking at the title bar of the message.

Related Topics
Attach files to email letters and calendar events in Outlook.com or Outlook on the web
Source: https://support.microsoft.com/en-us/office/attach-files-or-insert-pictures-in-outlook-email-messages-bdfafef5-792a-42b1-9a7b-84512d7de7fc
0 Response to "It Appears That the Photo I Attached Was Not Sent"
Post a Comment